Powered By Blogger

Wednesday, July 25, 2012

Easy Fried Ravioli

They said it couldn't be done. They said I could never do it. They were WRONG! Ladies and gentlemen I have made homemade raviolis without the use of a pasta rolling machine. I used beef and Italian sausage, along with a Philadelphia Cooking Creme (garlic and herb). You guys could of course use ricotta cheese instead of the cooking creme. But I'm using the cooking creme in addition to some mozzarella cheese.

Okay so I cheated. Its true. Instead of making pasta dough, I bought egg roll wrappers. But before you say "Katelyn! Egg roll wrappers are for egg rolls and those awesome crunchy things they put on top of egg drop soup! Not raviolis!" remember my love for all things creative. You will discover that egg roll wrappers can be pretty versatile in pasta dishes. But that's a blog for another day!

As you will note from the picture, my Italian sausage is in links. That's the only way my butcher sells it. So if you don't get yours in bulk either, just make a slit in the casing and squeeze the sausage out. Discard the casings. I use sweet Italian sausage but mild or hot would work just as well. Whatever you prefer. I fry my ground chuck and Italian sausage together. Cook thoroughly over medium heat. Drain the grease immediately then let the meat cool for about 15 minutes.

While your meat is cooling, fill a large frying pan with vegetable oil, about an inch deep. Heat until your handy dandy thermometer says 350° or use the Pop Test I told you about in my crispy chicken recipe.

While your water is coming to a boil cut your egg roll wrappers into four even squares. Once they are into squares seperate your squares into two seperate piles. One pile will be your Tops, the other will be your Bottoms.

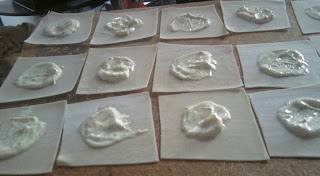
Spread a nice dollop of your cooking creme on each of your Bottoms. Remember to leave an edge all around so we can seal the Tops to the Bottoms.

Once your meat is cool you can add your cheese. Once the cheese is added put the mixture in your food processor and grind it fine. Put a spoonful of the freshly ground mixture on top of your cooking creme.

To seal your ravioli use a small bowl of water. Dip your (clean!) finger into the water and wet each edge. Firmly press your Top onto the Bottom, sealing it tightly.

Once your raviolis are ready, gently place them into the oil. Fry them for about 90 seconds. Place them on a paper towel to drain any excess grease.

Sauce choices are endless. I'm using a jarred spaghetti sauce but one could use a cream sauce, or a garlic butter sauce. Or even no sauce. Its all about personal preference.

So there you have it! A delicious, creative meal that can be easily altered to fit your family's needs. Want a vegetarian version? Chop up some mushrooms and cook them with some Italian seasoning and use them in place of meat. Heck, add mushrooms to the meat! Anything that you'd like, go for it. From my kitchen to your table!

Monday, July 23, 2012

Butterscotch Chocolate Chip Waffles

Waffles are such a versatile food. Savory or sweet. Topped or plain. So many flavors and possibilities. I happen to love the sweet variety of waffles and that is reflected in this recipe.

As I'm sure you guys have noticed, I'm not big on exact measurements but for this recipe its necessary. So today we will be using: 2 cups all-purpose flour, 1 teaspoon salt, 4 teaspoons baking powder, 2 tablespoons white sugar, 2 eggs, 1 1/2 cups warm milk, 1/3 cup butter, melted, 1 teaspoon vanilla extract, 1/2 cup chocolate chips and 1/2 cup butterscotch chips.

Mix it all together and you have a great waffle batter. You'll want to let this sit while your waffle iron heats up. I like how it thickens up. I spray my waffle iron with nonstick spray. It says its not necessary but it adds an extra crisp factor. Remember just put your batter in the middle and spread it out gently. DO NOT smoosh the top down. There's no need. Follow the directions that come with your waffle iron. My waffles take about five minutes to cook.

After your waffles are cooked you can top them however you like, I top mine with whipped cream and sliced strawberries since I find syrup to make the waffles seem overly sweet. But that's a personal preference. I also fried up some sausage links to go with it but you can have the protein of your choice or even allow the waffles to steal the show and stand alone.

I hope you try different toppings and fillers to these great waffles. Maybe try blueberries or white chocolate chips. Or both! This recipe is so versatile you can add just about anything. So here's a great meal from my kitchen to your table!

Saturday, July 14, 2012

Chicken and Veggie Alfredo

Tonight I'm making chicken alfredo but not from scratch. I have never mastered the alfredo sauce, I'm ashamed to admit. So I use a sauce packet. I serve mine over whatever noodle strikes me. So today I'm using egg noodles. I'm also using a bag of frozen stir fry veggies. I usually use just broccoli but I didn't have it up there so I figured why not?

The first step is to cut up your chicken. I use bite size chunks but any size you want is fine. If you want to pan fry a whole breast and throw it over your noodles I say go for it! Never be afraid to try something new! Put a little olive oil in a frying pan and cook your chicken all the way through. Add your veggies and cook until heated through.

Follow the directions on the back of your alfredo sauce mix, and as you do so boil up your noodles. Pretty soon you'll have all the components to a great meal ready for your belly.

As you've probably noticed, almost all of these components are store bought and premade. This is because I'm an average mom and while I love to cook, I do have a two year old who likes attention. This meal is delicious and easy to make, fast. I would never discourage anyone from making a meal from scratch, and I have made this meal from scratch. I'm simply providing a delicious alternative for someone who doesn't have time to do so. I hope you enjoy this fast, great meal from my kitchen to your table!

Thursday, July 12, 2012

Crispy Cracker Crumb Crusted Chicken

On Jul 12, 2012 6:10 PM, "Katelyn McEown" <kermitkisses23@gmail.com> wrote:

Tonight I'm making one of my fiancée's favorite foods. Crispy Cracker Crumb Crusted Chicken! Besides having a fun name, this dish can be very fun to make. If you have kids this is a meal they can get involved in. My two year old even gets involved. This dish is as simple as it gets.

All you need is a pound of chicken breasts cut to the desired size, two eggs, a half a cup of milk, vegetable oil for frying and one sleeve of crushed club crackers. My daughter does the cracker crusging in a large freezer bag with one of her toy hammers. If you dont have toy hammers laying around a rolling pin works just as well. I don't like to crush my crackers down fine because I love the texture of the bigger cracker pieces but you can crush them down as fine as you'd like.

Crack your eggs into a medium mixing bowl. Add your milk and whisk them like you're making scrambled eggs. Pat your chicken pieces dry with a paper towel before dredging them in your egg mixture Make sure each piece gets well coated.

The next step has a few options for its completion. Personally I put my cracker crumbs in a gallon size freezer bag to crush them, so I just place my egg coated chicken chunks in the bag and shake like mad. But if you would prefer you can always place your cracker crumbs in shallow dish and hand coat each piece. If you find that your cracker coating isn't sticking the way you would like, you can always dunk them back in the egg and repeat your breading process. Its all about personal preference.

I use a deep skillet to fry my chicken in, because I don't own a deep fryer. If you have a deep fryer, heat it up to 375° and cook your chicken chunks for 8-10 minutes. If you're like me and don't have a deep fryer, put enough oil in your skillet so its about an inch deep. Heat it until your handy dandy thermometer reads 375°. Now if you're working with the barest kitchen essentials and are thermometer-less you can always use the pop test. Sprinkle a drop or two of water on your oil. If it pops your oil is ready. Carefully place your chicken in the hot oil and let it cook for 4-5 minutes on each side. Drain off any excess grease on a paper towel. Serve with your favorite dipping sauce. Voila! A great meal from my kitchen to your table!

Wednesday, July 11, 2012

Leftovers To The Rescue

I had a beautiful dinner planned for tonight. Tune in tomorrow for that one! Haha. My chicken breasts were sitting in the freezer, completely overlooked by me, until I went to cook dinner and said whoops. Since I refuse to defrost chicken in the microwave I had to come up with something quick. A quick scan of my fridge revealed... payday is still two days away. Ha. However it also revealed a leftover whole chicken (minus his legs and wings) and some shredded cheese so I scanned my pantry and found tortillas, a can of olives, a can of refried beans and an onion.

So today's entry is how a simple chicken carcass made the great leap from garbage bound to a delish dish in less than half an hour.

Take the chicken meat off the bone and shred it up with a fork. Make sure you take the skin off. Heat it up in the microwave before stirring in some taco seasoning.

Warm up your refried beans before spreading them onto a tortilla. Pile on your chicken, onions, olives cheese and sour cream.

You now have a delectable leftover remake. So just remember, the possibilities are endless when it comes to leftovers so don't let them go to waste! Voila! A great and easy meal from my kitchen to your table!

Tuesday, July 10, 2012

Easy Penne and Meatballs

Today I'm making homemade meatballs served over some nice penne noodles. In my household homemade doesn't mean I don't cut corners. I use pre made ingredients just as often as any young mother. Tonight my premade ingredients include a Kraft Fresh Take (Savory Four Cheese), a jar of spaghetti sauce and boxed penne noodles. I always use boxed noodles, just for future reference.

Our fresh ingredients include: one small onion. Haha that's it. This meal is fairly easy to prepare.

Our thawed ingredients include: one pound of ground chuck. I use chuck as opposed to hamburger because I find it has a lot less grease but just the right amount of fat to help the Fresh Take hold our meatballs together. Why is it thawed? Because like most people my age I don't have tons of money laying around so I buy meat in bulk when its on sale.

I'm only going to be using garlic powder in this recipe because the Fresh Take has plenty of flavor. I will also use a tablespoon or two of sugar in the prepared spaghetti sauce but that's a personal preference and not at all necessary for this dinner to be delicious.

The preparation of the meatballs is simple. Put your ground chuck in a mixing bowl. Add your Fresh Take and a teaspoon of garlic powder. I use latex gloves to mix (powder free!) but if you don't mind getting your hands dirty go ahead and dig in!

Now this particular Fresh Take has feta cheese in it. I personally have a love for all things feta, a love I inherited from my mom who puts it on and in anything she can, including tacos! In this recipe the feta will add a great creamy and salty dynamic to our meatballs that I think is fantastic. But if you have an aversion to the cheese my daughter calls Stinky Cheese another Fresh Take can be easily substituted.

Once your meat mixture is thoroughly combined you can start forming your meatballs. Now you can make any size meatball you'd like, but because I have a two year old who is very independent and doesn't like for mommy to cut up her food anymore, I'm making one inch meatballs.

Once all your meatballs are formed you're gonna want to put them on an ungreased baking sheet. Pre heat your oven to 350° and when you're ready pop those meatballs right in! Cook them for about thirty minutes ( if you made bigger meatballs you may want to cook them a little longer) and once they're cooked completely pull them out and put them aside. We have big plans for them but not until later.

While the meatballs are cooking in the oven fill a large pot with water. I never measure my water out. Shameful huh? If you feel the need you can always use the directions on the back of the noodle box. Once you have your water in your pot add a generous sprinkling of table salt. This brings the boiling point of the water a little bit higher, thus cooking your noodles a little faster ( thank you freshman physical science! ) and I promise it wont make your noodles salty. Once your water is at a rolling boil add your pasta. I use a little less than half the box since there are only three of us in my household. If you want a more exact measurement for your family consult the back of the box. Cook until tender, then drain the pasta. I use my metal strainer for this. Then go ahead a put them back in their pot.

While the noodles cook dice up your onion. In a large saucepan add a tablespoon of olive oil before adding the diced onion. Cook the onion until it is tender and translucent. Then add your jar of spaghetti sauce. Now would be a good time to add any seasonings you like. I found a sauce I like very much and the only thing I add is a tablespoon of sugar.

Now all that's left to do is decide how you're going to serve your meal. When I have guests over I place each component of the meal in a large serving bowl and let the guests serve themselves. But since tonight is just the family, I will just put noodles in a bowl with a few meatballs and top it off with some sauce. And because I'm a fan I sprinkle parmasean cheese on top. Voila! A great meal from my kitchen to your table!

Welcome To My Blog

I figure if I'm going to be posting recipes and pictures every day I might as well tell you a little bit about myself. I'm a 20 year old mom. I have a two year old and I'm getting married soon. Woooo. I've always loved to cook. And I'm proud to say I've gotten pretty darn good at it. I don't cook low Carb, healthy or vegetarian but I do cook realistically and on a budget. I don't really do fancy plating because I think the food speaks for itself. I do appreciate you taking time out of your day to see what I'm up to and I hope I can inspire you to create some really great food for your family! Lets get cooking!